Homemade Xiao Long Bao – 小籠包

Well, after we came back from Shanghai, China, we were really missing some delicious Xiao Long Bao so we decided to be adventurous and make some!

The process is time consuming, but it was delicious! We just enjoyed some frozen ones, and sadly, I had to say mine tasted better! Not bad for a first time attempt! There is 3 parts to making Xiao Long Bao, and it starts with the soup part

Ingredients for Soup:
Pork Belly Meat
1 Package of Gelatin
Water

First of all, make a soup with fatty meat so it solidifies. I boiled some pork feet with pork belly in water until it reduced to about half. When I claimed it was done, I seasoned it up as though I was about to drink it – with a little heavier hand of seasoning!

Now, we have to let the soup set and become “jello” so I add a package of flavourless gelatin just to make sure it sets. Put it in the fridge at least 3 hours before using it!

The next thing I did was to marinate the meat. I wanted the meat to be full of flavour so I did that before making the dough.

Ingredients for Filling
1/2 lb regular ground pork
2 tbsp 5-Spiced Powder
1 tsp sugar
1 tbsp soy sauce
1/2 tsp white pepper
1 tsp rice wine
1 tsp sesame oil
chuck of ginger (minced)
chopped green/spring onion
1 tsp salt

Basically here, mix everything together and let it marinate in the fridge!

If your soup has set at this point, pull back the layer of fat/oil and break down the soup jelly and mix it into the meat marinated. If you put this in at this point, make sure you keep the meat in the fridge so your soup doesn’t become “soup”.

Now, as everything is chilling and developing their flavours, we can make the dough!

Ingredients for dough:
200g A/P Flour
1/8 cup of cold water
1/3 cup of hot water (I used boiling water)
1 tsp salt

Making the dough is actually super easy! Basically you measure out the flour and pour the boiling water in. Mix until the dough is smooth and keep mixing as we’re trying to develop the gluten!

When it’s soft and smooth, add the cold water in and knead for a few more minutes! It will have a nice texture and bounce back when you poke it – then it’s ready. When you reach this point, let it rest in the bowl covered for at least 30 minutes.

After it’s rested, roll it out. I rolled mine out in a pasta roller to get the consistent thickness – and on my machine, I had it at setting “6” for the perfect thickness! I then cut out circles so I can fill the xiao long bao

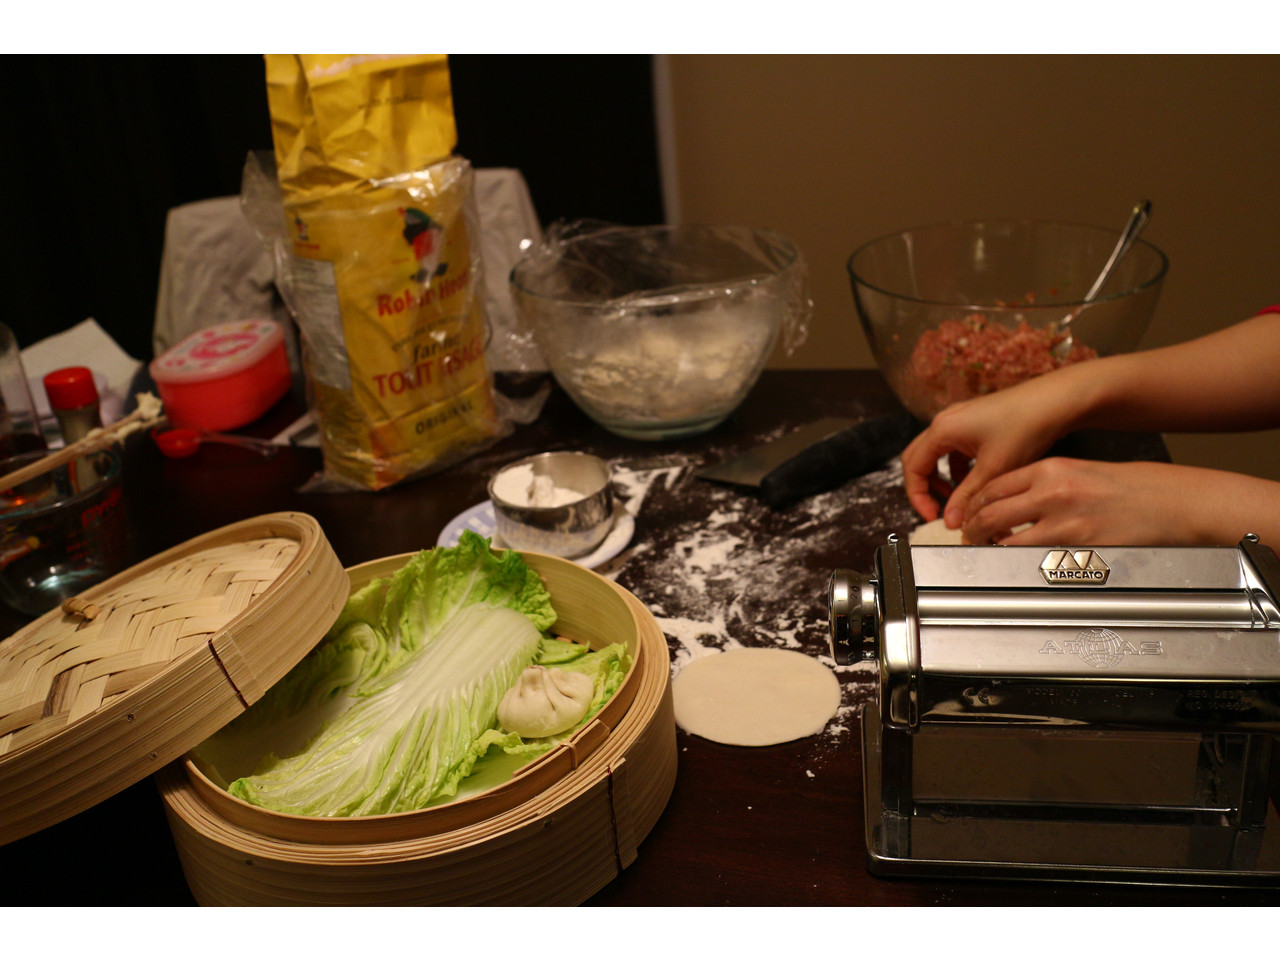
Then, I get to fill the xiao long bao wrappers and place them on a cabbage lining to my bamboo steamer! I tried to make as many pleats as possible as that’s how it’s prettiest.

Now, we prepare the steamer and we’ll steam for about 15 minutes!

Now it’s done! Be careful, it’s hot and the soup you can see at the bottom of the dumpling — this means it’s really hot!! Enjoy!

Homemade Pot Sticker Dumplings – 鍋貼

I’ve made potsticker dumplings or wor-tips before, but recently, I’ve got some co-workers who seem to have fallen in love with them. So, I decided I will make another batch just for them! This time, I was only able to find lean ground pork, so it was a little dry – and they ate it all up! I’m so proud of my coworkers! 🙂

Ingredients: (makes about 4 dozen using perogy press)
about 1 lb ground pork
3-4 leaves of nappa cabbage (Chinese Cabbage)
1/2 small onion
1 tbsp grated ginger
2 gloves garlic
1 tbsp Chinese 5 Spice
1-2 tsp white pepper
1 tsp salt
1 tbsp Worcestershire sauce
1 tbsp soy sauce
2 tbsp oyster sauce

Skin recipe:
3 cups all purpose flour
1 1/2 cups of boiling water (make more in case it’s too dry to come together)
salt

So, yes, the ingredient line up seems long but it’s all good, as it’s just typical ingredients any Asian would have in their pantry! First, wash the cabbage and peel the onion, ginger and garlic. I cut my cabbage into little pieces, and I grate the onion garlic and ginger. I put all these ingredients into a bowl.

From there, we can add the ground pork into the mixture, and mix a little bit.

Now, we can season it. It sounds funny, but you can add whatever you want and how much of it as you want. I don’t cook using measuring things, so it’s all “rough estimates”. Add whatever seasonings you like, add it as flavourful as you like, it’s yours and make it yours! So, from here, just add all the goodies and mix well. Oh yeah, you don’t like pork, don’t use pork! 🙂 I like it on the fattier side so it’s “juicier”!

I let my meat sit in the fridge for about an hour just to marinate the flavours a bit. If you like the meat firmer, crack an egg into it – kind of like a meat loaf filling. I like to leave mine alone.

Now some time has elapsed, we can start making the dumpling skins! It’s super simple and I do remember learning this from my grandma. But, I did have to cheat a little and verify with “Google” the right amount of water to flour, which is also a silly thing as all we’re making is a soft dough. If it’s too dry, add more water and vice versa! But, start by putting the flour in a large enough bowl to mix, and pour some salt on top and mix it around a little bit.

You pour the boiling water right into the flour mixture. Grandma use to just use her hands and mix. I do not recommend it as you will probably burn yourself. I think you should use a mixing spoon or something like it! But, mix it until it forms into a nice ball of dough. When this happens, take it out an knead it for a little bit, just enough to keep the ball together.

Now, I usually cut the dough into smaller pieces so it’s easier to work with. Keep the other dough not being used covered with a damp cloth. Roll out the dough so it’s flat and even. If you’re picky, run it through the pasta machine so it’s uniform in thickness.

Now we got strips of dough and we’re good to go to cut out circles! You can either just fill them and seal the edges with just some water, which is the traditional way… but I wanted to use my perogy press this time, so it looks the same. It wasn’t a great idea as you can’t STUFF them, but it’s okay.

There you go, you’ve made dumplings! If you’re freezing them, put them on a cookie tray so they don’t touch each other and freeze them individually first before you put them into a ziplock bag. This will prevent them from sticking together. Now, we pan fry them (or steam them, or how ever you want to enjoy them)!

Okay, I make it sound like it’s the simplest thing in the world, it is once you get the hang of it! It’s okay, practice makes perfect and as long as it tastes good, who cares how it looks! My first batch was really ugly! I’ll actually show you! 🙂 Just put the prettiest one up front, and it’s alright!

Homemade Vietnamese Canh Chua Hot and Sour Soup

I recently went to my favourite Vietnamese restaurant and asked them what they would recommend for me. It turns out it was Hot and Sour Soup. Thinking they were nuts, I ordered it anyway, and it’s nothing like Chinese Hot and Sour Soup. I guess I liked it even more than the Chinese style Soup. I made my version with some Rice Vermicelli in it as it was a dinner and it was delicious!

Ingredients: makes 4 bowls
1 tbsp chili flakes
2 cloves garlic
1/4 cup fish sauce
1 stalk lemon grass
4 chicken thighs (diced)
shiitake mushrooms
1 tomato diced
half can diced pineapple
1 stalk celery
bean sprouts (I forgot to purchase some, so my recipe doesn’t have any)

To make this soup, it’s actually easier than I would’ve imagined. Well, I took my own shortcuts as I don’t want to spend a ton of time cooking after work. But, you start with a bit of oil and toast the chili flakes and garlic. When it’s fragrant, pour some fish sauce into the pan and let it cook out a little bit on medium heat.

After it cooks up, add some broth or just water is fine and bring it up to a boil with some lemon grass. I actually put some of the pineapple juice in at this time as well when I made mine. I love pineapples, so I didn’t mind it being a bit sweeter than usual.

Once it’s boiling, I turned down the heat and added the chicken and let it cook thoroughly. I made sure it cooked through at this point, but I’m sure it would have been cooked completely by the time the vegetables were done if you cooked it only to it’s half way point at this step.

Now as it’s cooking away, chop up the vegetables and then throw it into the soup and let it cook until it’s tender crisp. In the restaurant they used some bean sprouts which I forgot to purchase, and I think it’s better with it. So, if you’re making this, buy some!

When it’s ready, I just tasted it to season to my liking with salt, honey and some sriracha and adjusted it. I added some rice vermicelli to mine, so I just softened it in some boiling water on the side, and place it in the bottle of my serving bowl. Then, I just ladled the soup on top and it was good to go! A perfect dinner for a cold night!

I really enjoyed this soup. I’ll keep modifying from this weird but basic recipe I made. Some people put lime, thai chilies and basil leaves in their soup and other herbs, so I’m sure it’ll be fun to modify!

Homemade Chicken Pot Pie

It’s been awhile since I’ve posted my own cooking now… but, I recently was asked to make my best friend a fail proof recipe for something chicken and fail proof. I chose to teach her Chicken Pot Pie as it’s very versatile, and you really can’t goof on it.

Ingredients: Serves 2 (you can always make more!)
2 pieces of boneless/skinless chicken thigh (or 1 piece of chicken breast)
1 chopped carrot
1 chopped small onion (1/2 Large onion)
1 stalk of celery
1/4 cup Frozen corn (optional)
1 pack of puff pastry
1 tbsp butter
1 1/2 tbsp flour
3/4 to 1 cup milk

First off, preheat the oven to 375C or 400C, I like to use 375C on my toaster oven as I’m only making 2 pies. Then start by chopping all the vegetables and putting it aside. Then, chop the chicken, and I just do a quick marinade with just salt and pepper. You can add more flavouring to it if you want. Sometimes, I use seasoning salt as well…

Then, I saute the chicken in a pan, low and slow until it cooks through about half way or a little more than half way. Then, I put the vegetables in and cook the entire thing until it’s cooked through. When I get to the cooked stage, I can taste the ingredients to make sure there’s enough flavour throughout.

I then remove all the cooked ingredients out of my pan and start my roux. I keep the heat on low and melt the butter. Once the butter has melted, I put the flour in and make sure it’s completely absorbed. I cook it longer to make sure there’s no flour taste. I normally let the butter brown before I call it done, and the flour/butter mixture will be a dough like consistency.

Once I’ve achieved that stage, I put the milk in add mix with a whisk. As it cooks, the milk mixture becomes creamy and thick, like a gravy! When it’s about the thickness I’d like it, I will add in my cooked chicken and vegetables and taste it again. If I find my gravy is too thin, I cook it longer… if it’s too thick, add more milk. At this stage, you can add the corn if you opted in for it.

When this is ready, scoop the pot pie fillings into a shell. Then, cut the puff pastry into a shape to top it off. Sometimes, I purchase the pre-cut ones to make my life a little simpler.

Now, we just pop the entire thing in the oven and let it bake for about 40 minutes (or until the crust looks golden and delicious). I find in my oven, it takes about 40-45 minutes. Take it out and be careful as it’s really hot!

Now, you’re ready to enjoy your “kind of homemade” Chicken Pot Pie! 🙂

Homemade Blueberry Pancakes

Well, this sounds a little strange but I’ve never tried to make my own pancakes before, let alone Blueberry Pancakes. I just realized it’s such a simple recipe as my co-workers told me if I want it more runny and thin, add more water. If I want it thicker and fluffier, add more flour. So, I made the fluffy version!

Ingredients: (makes 4 pancakes)
1 cup of flour
1 1/2 tbsp sugar
2 tsp baking powder
1 large egg
1 cup milk
blueberries
oil

This recipe is so simple, I actually just mixed all the dry ingredients in a bowl and then mixed the wet ingredients in… all in the same bow. I mixed until it was smooth, and let it sit to rest for a bit.

From there, I heated up my frying pan with a thin layer of oil. I made sure it gets nice and hot. Once the bubbles start forming and come to the top, you know you’re ready to flip!

Then, I just made it toasty in colour, served hot, topped with some butter and maple syrup! It’s delicious for you and your family to enjoy!