Homemade Steamed Spareribs 排骨

This month, I decided I was going to make one of my favourite dim sum dishes, Steamed Spareribs and I was excited about the way it turned out! It was fall off the bone tender, and still juicy and delicious!

Ingredients:
1 lb spareribs
1 tbsp black bean sauce (or fermented black beans smashed)
1 tbsp tapioca starch
1 tsp white pepper
1 tbsp cooking wine
1 tsp salt
1-2 cloves minced garlic

First, start by rinsing and drying your meat. I don’t know if it is necessary, but it’s a habit that I have for pork that I bring home from the store. Once you got the meat cleaned and dried, I put it in a steam proof dish where I will get the spare ribs marinated in.

Then, I put all the ingredients together and put some plastic wrap over the spareribs and let it sit for at least an hour in the fridge.

When I’m ready to steam, I prepare my steamer and put the spareribs in and cover without the saran wrap. This will steam for about 45 minutes on medium high.

After 45 minutes or more has elapsed, the spareribs are ready! Becareful as it’s really hot, but the meat will come off the bones nicely and it will be packed with flavour!

We enjoyed ours over rice for this meal and it was pretty tasty! Of course, you can add some green onions to garnish, or put some whole fermented black beans on top! I didn’t do anything and just served and enjoyed!

Homemade Har Gow (蝦餃)

Something a little different from the usual things I make, we made Har Gow from scratch! It tasted good but definitely doesn’t have the normal har gow look.

Ingredients: (makes about 15)
Skin:
1 1/2 Cup Wheat Starch
2 tbsp tapioca Starch
1 cup boiling water
1 tbsp oil
1 tsp salt

Filling:
800 gram of shrimp
2 tbsp tapioca starch
1 tbsp minced ginger
1 tbsp light soy sauce
salt and white pepper to taste

The first thing we do is mix together the tapioca starch and wheat starch with some salt. Once that has mixed in, I drizzled in the oil and started drizzling the boiling water.

Once the dough begins to form into a ball, pull the warm mixture out and knead until it’s putty texture. Mould the dough into a log and put plastic wrap or a wet cloth over it and let it sit for at least 30 minutes.

While the dough is resting, we can prepare the shrimp by chopping the shrimp and marinating it. I used about 800grams of shrimp for my recipe and it was the perfect amount! So, we just chopped and marinated the shrimp.

As the shrimp is marinating, we can prepare the steamer with cutting out vent holes in the parchment paper and setting it into the bamboo steamer.

Now the the dough and the shrimp is ready, we prepare the dough by cutting the log into smaller pieces. Taking a small rolling pin, roll out one of the cylinders of dough. I found an oval shape was actually easier than circular shape. However, I was not successful making the iconic ha gow shape.

Now, we stuff the har gow with about 1 tablespoon of filling, then trying your best to pinch upwards around the shrimp. My dough was a little stiffer than I would like it, so it tore easily. I just pressed down to seal right away. Then, we lined the prepared steamer with these har gows.

This was the interesting part, I wasn’t sure how long to steam these har gows that looks like dumplings. I put it on the steamer for about 10 minutes and it worked well. Everything was cooked and it tasted good too! The skin was relatively translucent, but I think it would be more clear if I got the skin thinner… however, the texture didn’t work properly for me on this try!

Overall, it was a fun meal to make and it was tricky and time consuming. Dim sum isn’t known to be easy but we enjoyed eating this delicious dim sum!

Homemade Shumai – 烧卖

I’ve been trying to make some more homemade dim sum, and this time we’re in the kitchen making some Shu Mai, and I like using pork. You can substitute with chicken, or a mixture with shrimp as well. Today, we’re making all pork shu mai! This recipe makes about 20 shu mai, which is 2 large steamer baskets full.

Dough Ingredients:
1 cup All Purpose Flour
1/2 tsp salt
1 large egg
1/4 cup cold water

Filling Ingredients:
1/2lb ground pork
2 black shittake mushrooms
1/2 tbsp ginger
1/2 tbsp green onion (whites)
1/4 tsp seasame oil
1/2 tsp white pepper
1 tsp soy sauce
1/2 tbsp corn starch

First, we’ll make our dough for the skin of the shu mai. I’m using wonton skins. Since I earned a stand mixer, I will use it as much as possible from now on! So, in the stand mixer, I put all the dry ingredients in it and mix it briefly. Then, put the egg in and try to get it into a nice dough.

Once you start mixing it, add some cold water until it becomes a ball. Make sure the dough doesn’t get too wet. You just want a little bit sticky.

When you got your dough ball, wrap it up and let it rest in the fridge for at least 20 minutes. I got to attach the pasta maker attachment to my stand mixer and I roll out the dough to a level “5”, then we cut out circles. These wonton skins don’t last long as they don’t have preservatives in it, so expect it to be good for up to 3 days.

Now, we get the filling ready, and we mix all the filling ingredients together and make sure they’re chopped small, or minced. Let the meat marinade at least 30 minutes.

Once you got the meat ready, take about 1 tbsp of meat onto the center of the skin. Wet the edges of the skin so it can stick to each other. Pull the sides up around the dumpling leaving the top exposed. You can top the shu mai if you want, but I left mine as is because I forgot to purchase ingredients. Original idea was putting a shrimp up top… Once you got your shu mai made, you can put it in your lined steamer (steaming) or lined cookie tray (freezing).

If you’re freezing them, make sure you give them some space in between the shu mai so they don’t stick. Freeze them for about an hour before you put it in a ziploc bag. For us, we steamed ours right away and we steamed on med-high heat for 10 minutes. It was perfect!

Overall, this was quite a simple recipe, and there are tons of options for varieties, and even short cuts! You can get premade wonton wrappers, you can swap out meat, add other things or anything! This is a great base recipe! For me, this recipe made more skins than I needed, so adding stuff to the filing mixture will help even it out!

Homemade Xiao Long Bao – 小籠包

Well, after we came back from Shanghai, China, we were really missing some delicious Xiao Long Bao so we decided to be adventurous and make some!

The process is time consuming, but it was delicious! We just enjoyed some frozen ones, and sadly, I had to say mine tasted better! Not bad for a first time attempt! There is 3 parts to making Xiao Long Bao, and it starts with the soup part

Ingredients for Soup:
Pork Belly Meat
1 Package of Gelatin
Water

First of all, make a soup with fatty meat so it solidifies. I boiled some pork feet with pork belly in water until it reduced to about half. When I claimed it was done, I seasoned it up as though I was about to drink it – with a little heavier hand of seasoning!

Now, we have to let the soup set and become “jello” so I add a package of flavourless gelatin just to make sure it sets. Put it in the fridge at least 3 hours before using it!

The next thing I did was to marinate the meat. I wanted the meat to be full of flavour so I did that before making the dough.

Ingredients for Filling
1/2 lb regular ground pork
2 tbsp 5-Spiced Powder
1 tsp sugar
1 tbsp soy sauce
1/2 tsp white pepper
1 tsp rice wine
1 tsp sesame oil
chuck of ginger (minced)
chopped green/spring onion
1 tsp salt

Basically here, mix everything together and let it marinate in the fridge!

If your soup has set at this point, pull back the layer of fat/oil and break down the soup jelly and mix it into the meat marinated. If you put this in at this point, make sure you keep the meat in the fridge so your soup doesn’t become “soup”.

Now, as everything is chilling and developing their flavours, we can make the dough!

Ingredients for dough:
200g A/P Flour
1/8 cup of cold water
1/3 cup of hot water (I used boiling water)
1 tsp salt

Making the dough is actually super easy! Basically you measure out the flour and pour the boiling water in. Mix until the dough is smooth and keep mixing as we’re trying to develop the gluten!

When it’s soft and smooth, add the cold water in and knead for a few more minutes! It will have a nice texture and bounce back when you poke it – then it’s ready. When you reach this point, let it rest in the bowl covered for at least 30 minutes.

After it’s rested, roll it out. I rolled mine out in a pasta roller to get the consistent thickness – and on my machine, I had it at setting “6” for the perfect thickness! I then cut out circles so I can fill the xiao long bao

Then, I get to fill the xiao long bao wrappers and place them on a cabbage lining to my bamboo steamer! I tried to make as many pleats as possible as that’s how it’s prettiest.

Now, we prepare the steamer and we’ll steam for about 15 minutes!

Now it’s done! Be careful, it’s hot and the soup you can see at the bottom of the dumpling — this means it’s really hot!! Enjoy!

Homemade Pot Sticker Dumplings – 鍋貼

I’ve made potsticker dumplings or wor-tips before, but recently, I’ve got some co-workers who seem to have fallen in love with them. So, I decided I will make another batch just for them! This time, I was only able to find lean ground pork, so it was a little dry – and they ate it all up! I’m so proud of my coworkers! 🙂

Ingredients: (makes about 4 dozen using perogy press)
about 1 lb ground pork
3-4 leaves of nappa cabbage (Chinese Cabbage)
1/2 small onion
1 tbsp grated ginger
2 gloves garlic
1 tbsp Chinese 5 Spice
1-2 tsp white pepper
1 tsp salt
1 tbsp Worcestershire sauce
1 tbsp soy sauce
2 tbsp oyster sauce

Skin recipe:
3 cups all purpose flour
1 1/2 cups of boiling water (make more in case it’s too dry to come together)
salt

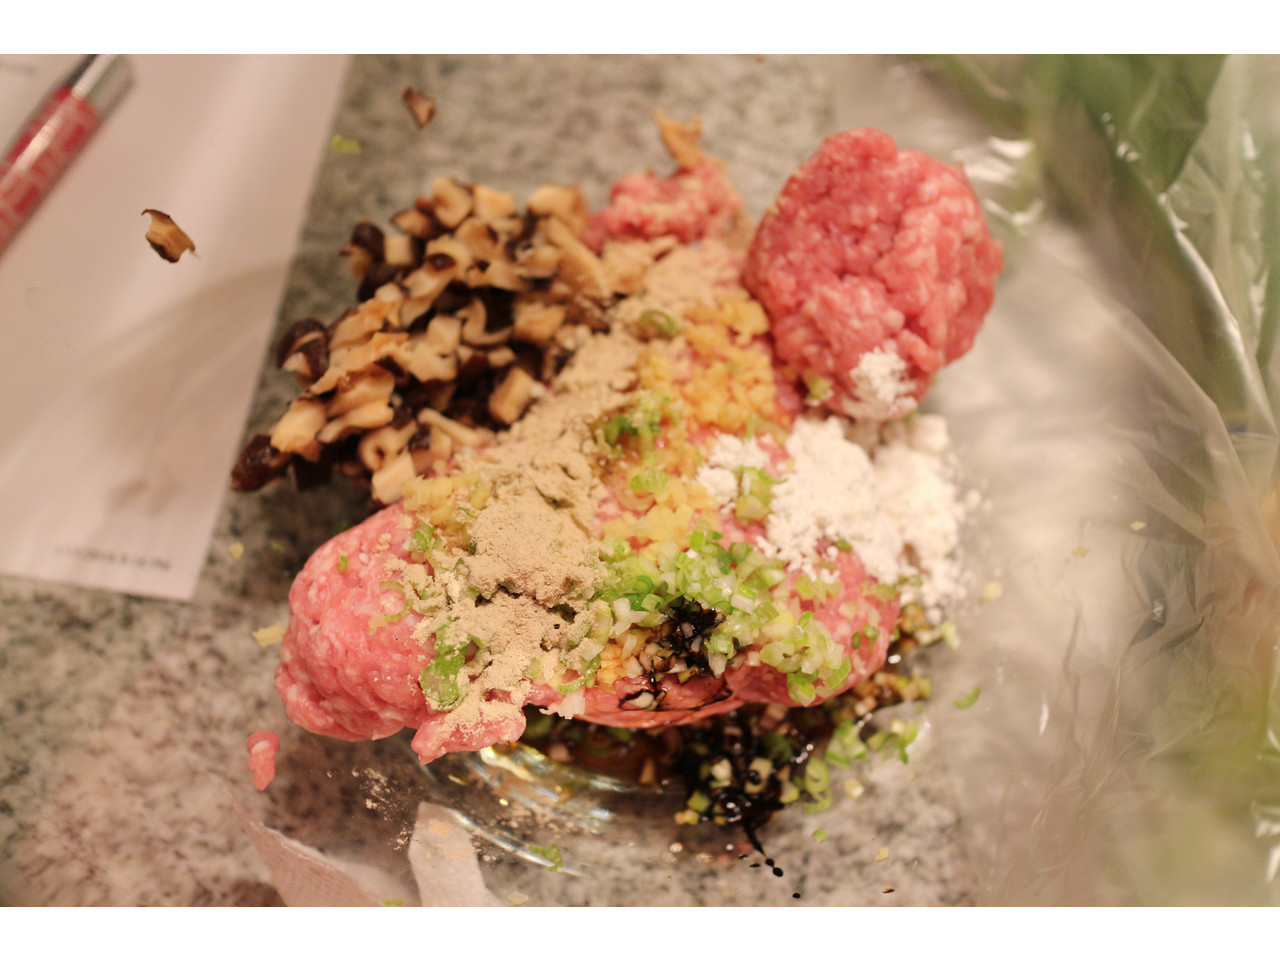
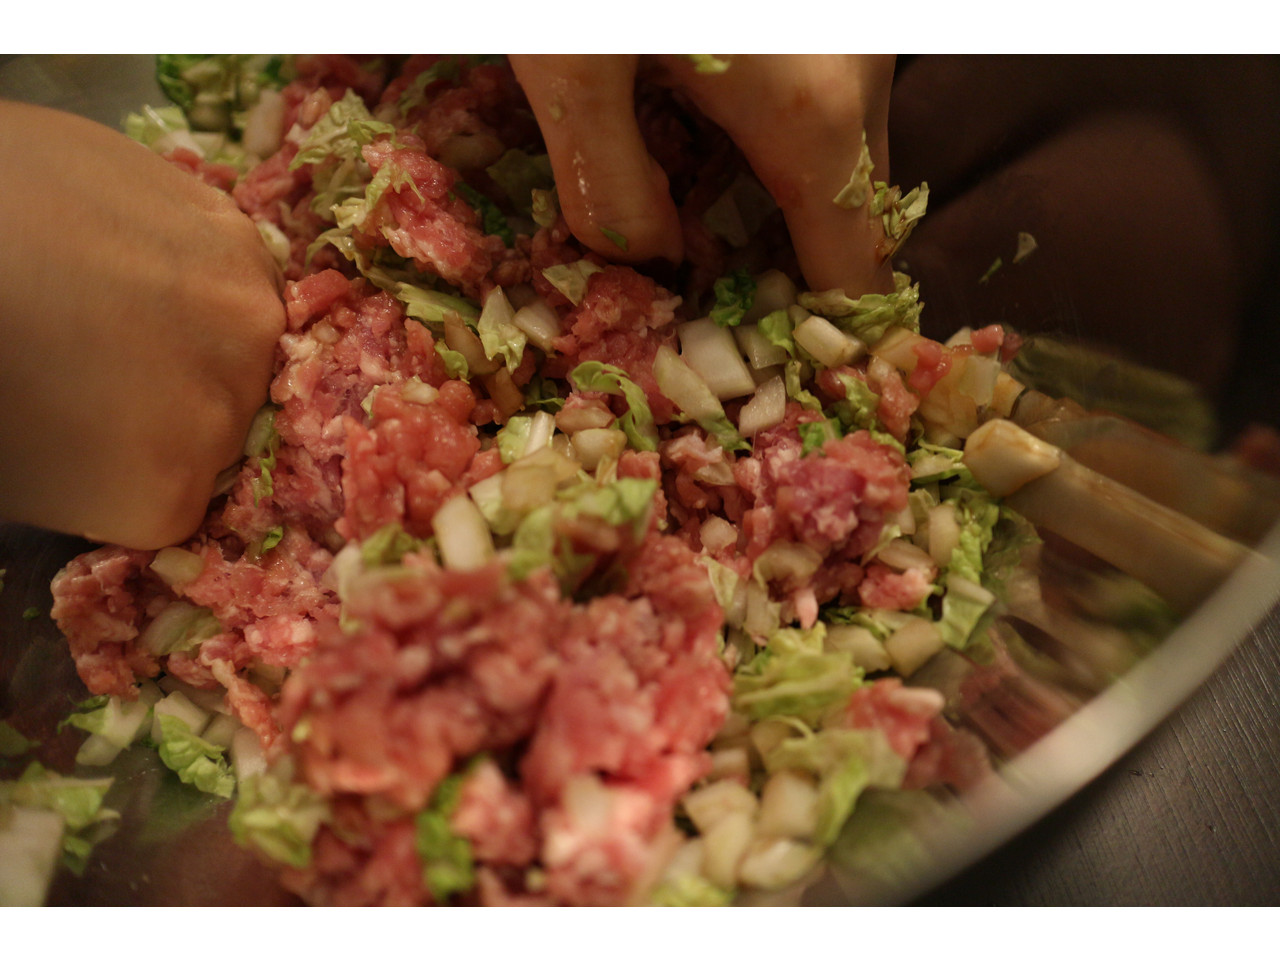
So, yes, the ingredient line up seems long but it’s all good, as it’s just typical ingredients any Asian would have in their pantry! First, wash the cabbage and peel the onion, ginger and garlic. I cut my cabbage into little pieces, and I grate the onion garlic and ginger. I put all these ingredients into a bowl.

From there, we can add the ground pork into the mixture, and mix a little bit.

Now, we can season it. It sounds funny, but you can add whatever you want and how much of it as you want. I don’t cook using measuring things, so it’s all “rough estimates”. Add whatever seasonings you like, add it as flavourful as you like, it’s yours and make it yours! So, from here, just add all the goodies and mix well. Oh yeah, you don’t like pork, don’t use pork! 🙂 I like it on the fattier side so it’s “juicier”!

I let my meat sit in the fridge for about an hour just to marinate the flavours a bit. If you like the meat firmer, crack an egg into it – kind of like a meat loaf filling. I like to leave mine alone.

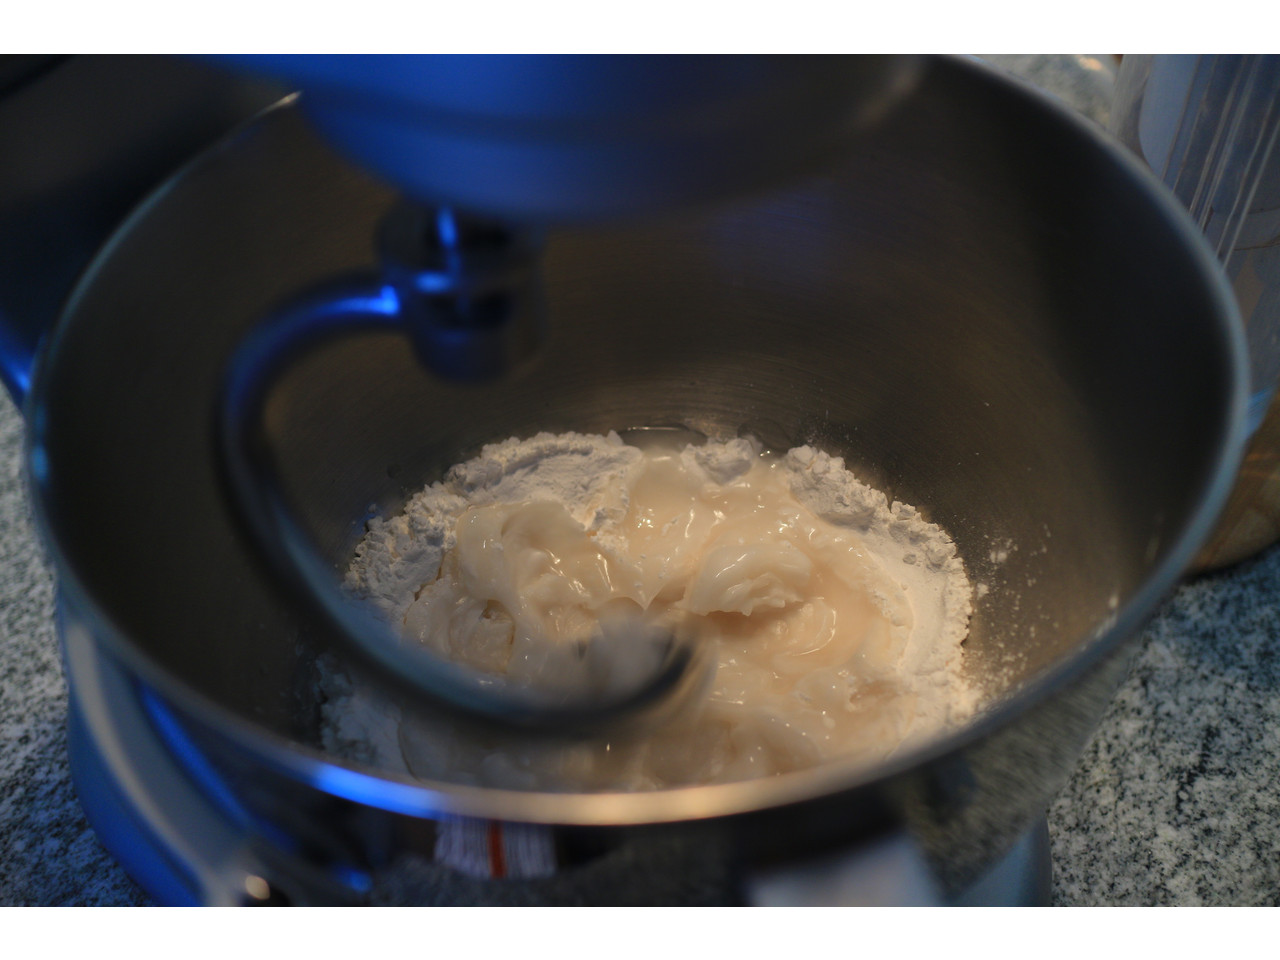
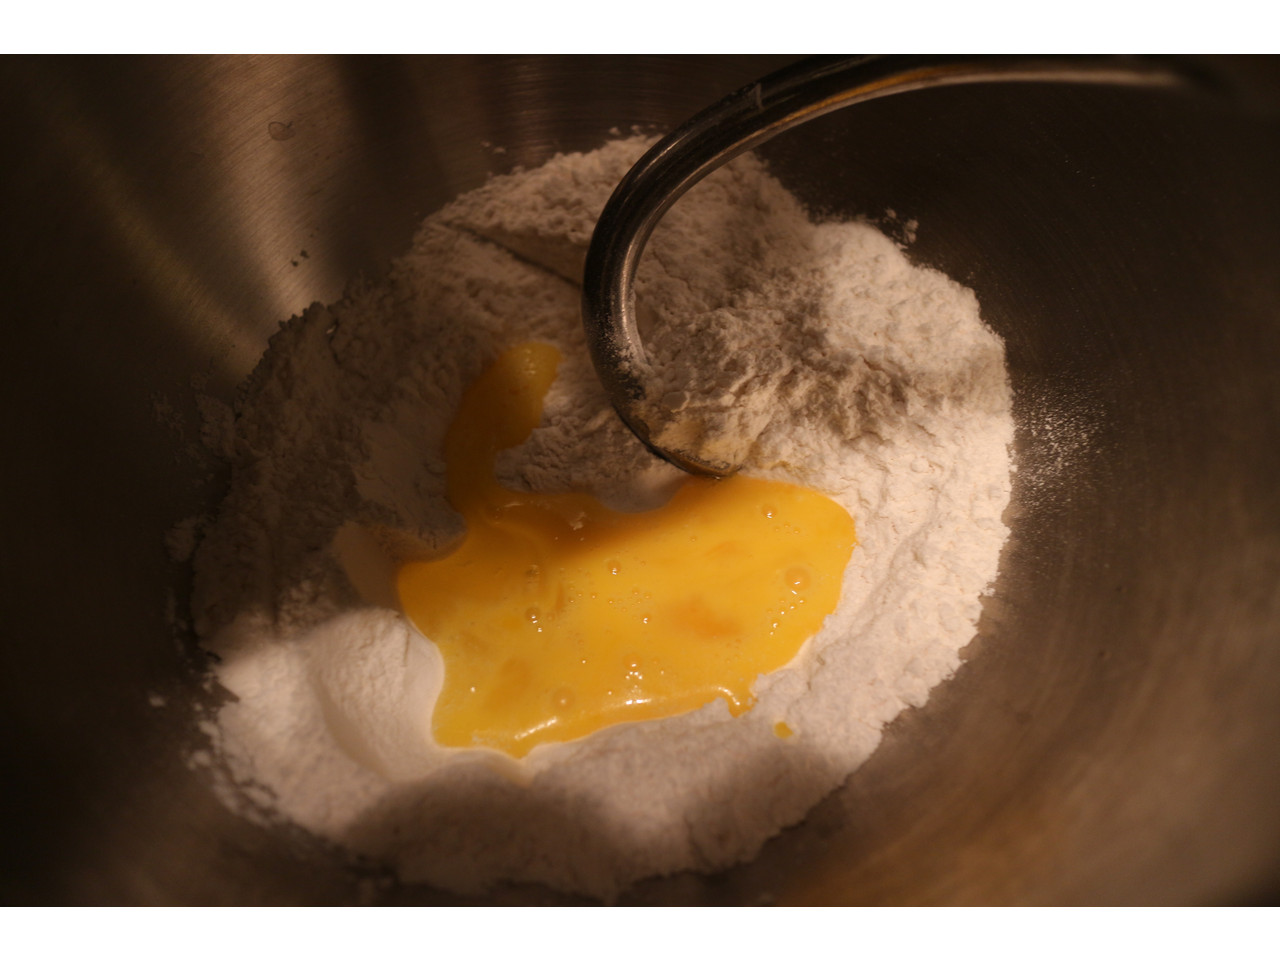
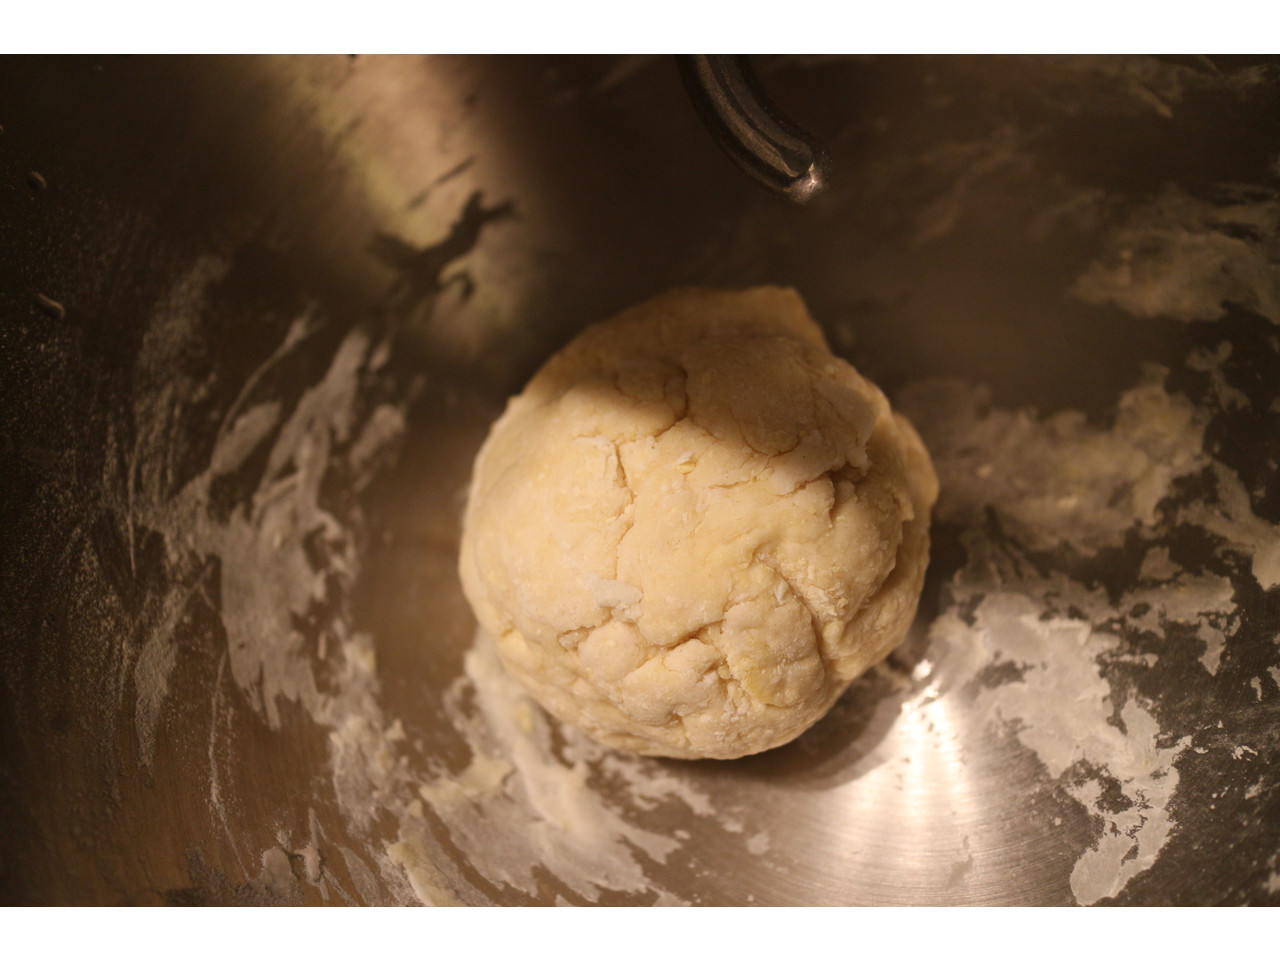
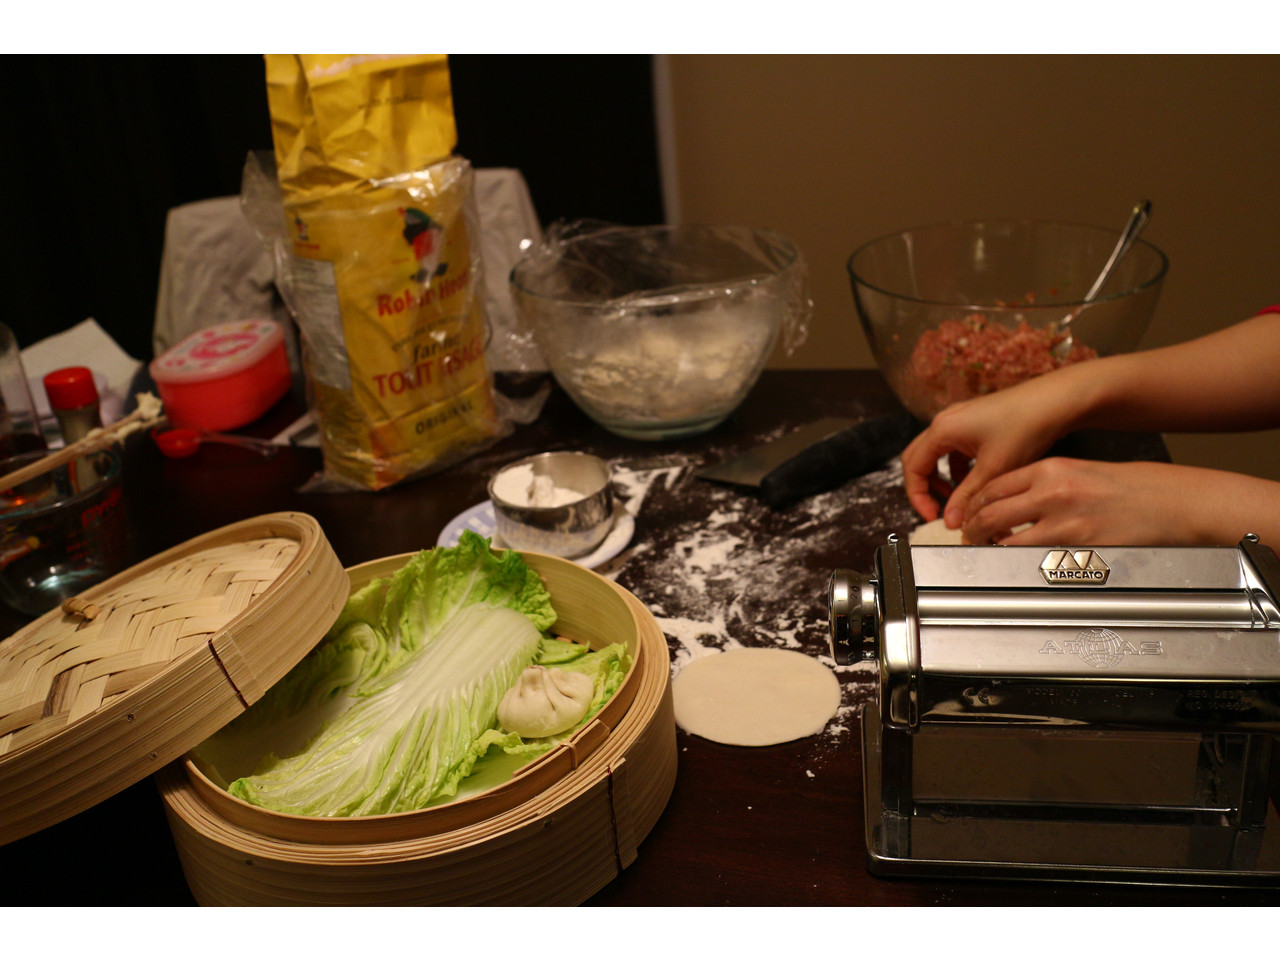
Now some time has elapsed, we can start making the dumpling skins! It’s super simple and I do remember learning this from my grandma. But, I did have to cheat a little and verify with “Google” the right amount of water to flour, which is also a silly thing as all we’re making is a soft dough. If it’s too dry, add more water and vice versa! But, start by putting the flour in a large enough bowl to mix, and pour some salt on top and mix it around a little bit.

You pour the boiling water right into the flour mixture. Grandma use to just use her hands and mix. I do not recommend it as you will probably burn yourself. I think you should use a mixing spoon or something like it! But, mix it until it forms into a nice ball of dough. When this happens, take it out an knead it for a little bit, just enough to keep the ball together.

Now, I usually cut the dough into smaller pieces so it’s easier to work with. Keep the other dough not being used covered with a damp cloth. Roll out the dough so it’s flat and even. If you’re picky, run it through the pasta machine so it’s uniform in thickness.

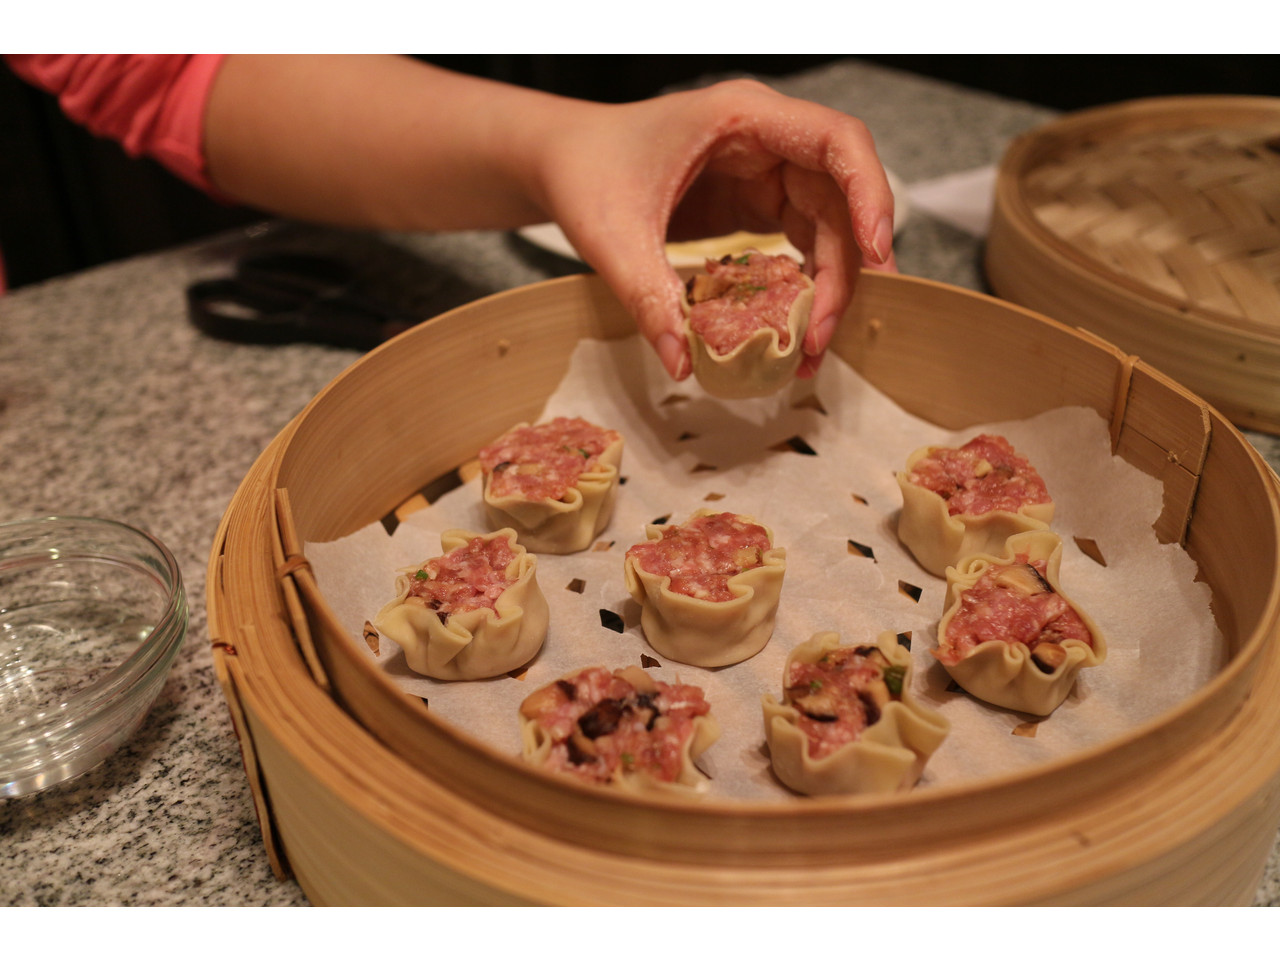
Now we got strips of dough and we’re good to go to cut out circles! You can either just fill them and seal the edges with just some water, which is the traditional way… but I wanted to use my perogy press this time, so it looks the same. It wasn’t a great idea as you can’t STUFF them, but it’s okay.

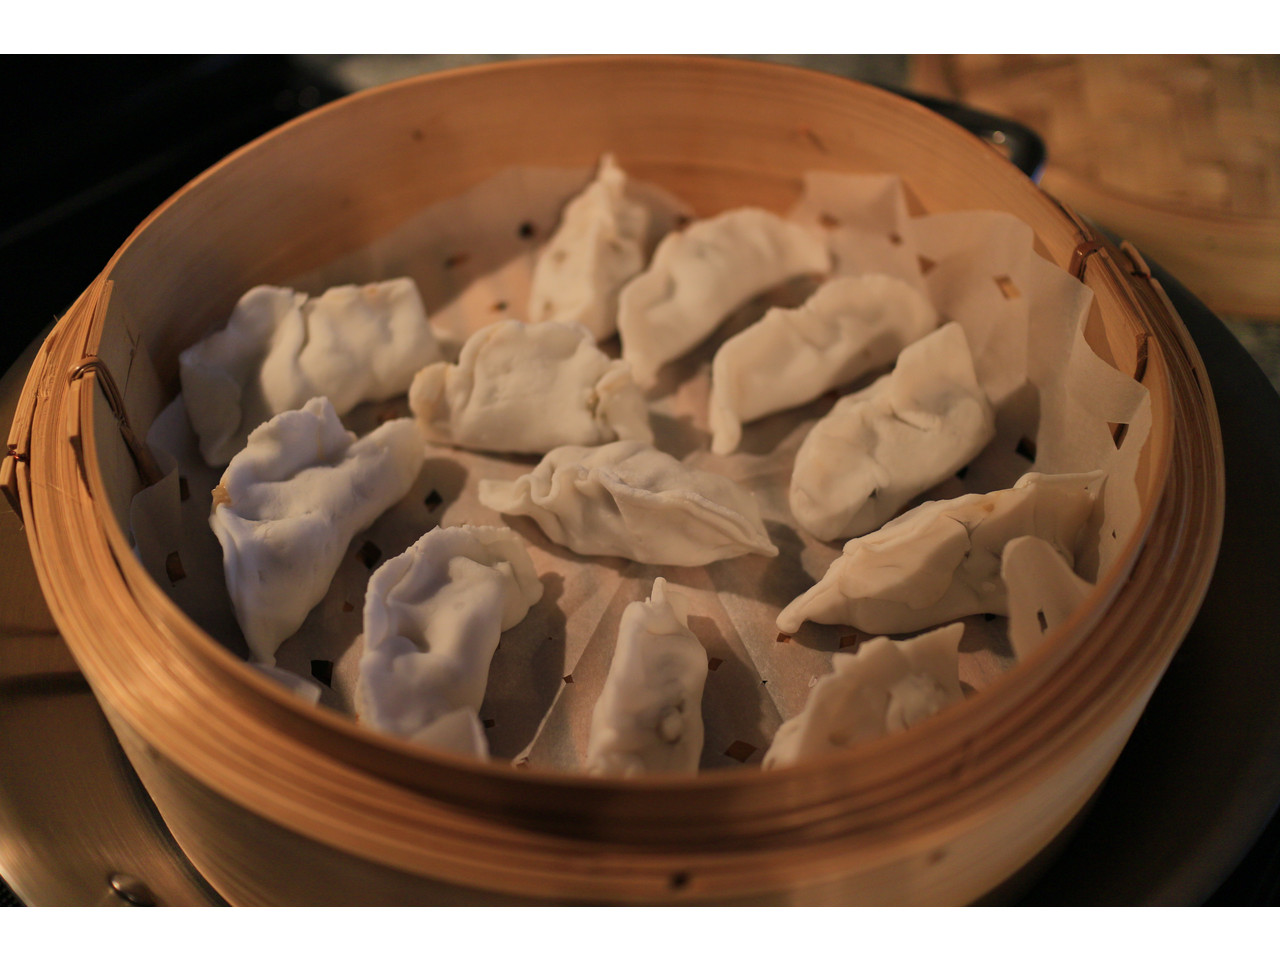
There you go, you’ve made dumplings! If you’re freezing them, put them on a cookie tray so they don’t touch each other and freeze them individually first before you put them into a ziplock bag. This will prevent them from sticking together. Now, we pan fry them (or steam them, or how ever you want to enjoy them)!

Okay, I make it sound like it’s the simplest thing in the world, it is once you get the hang of it! It’s okay, practice makes perfect and as long as it tastes good, who cares how it looks! My first batch was really ugly! I’ll actually show you! 🙂 Just put the prettiest one up front, and it’s alright!